Underlining and highlighting can be useful ways to keep track of a reading text. But try doing that with ten questions and several people talking about similar experiences. Before long, almost everything is highlighted. Unless you have ten different colours and a very good memory, it becomes difficult to see which detail belongs to which question. For B2 First Reading Part 7, taking the information out of the texts and organising it in a simple grid can help. It takes practice, but it makes you look closely at what each person actually says.

Contents
What does B2 First Reading Part 7 test?
Part 7 is a multiple-matching task. You have ten questions and either one longer text divided into sections or several shorter texts. For each question, choose the text or section that contains the relevant information. You can choose the same letter more than once, and each correct answer is worth one mark.
The task tests your ability to find specific information and understand it accurately. Several people may mention the same subject, but only one will express the complete idea in the question. Someone who considered changing jobs is different from someone who actually applied for a new position.
The questions don’t necessarily follow the order of the information in the texts. You might find an answer in the final sentence, then head back to the beginning for another. Unlike the work on text structure in B2 First Reading Part 6, here you need to move between texts and locate particular details. That means combining scanning with careful reading.
Scan for evidence, then organise it
Scanning means moving through a text to find the information you need. Think of it like scrolling through Netflix to find your next series. You don’t read the description of every programme. Your eyes move from one option to another until something matches what you’re looking for. Then you slow down and take a closer look.
In B2 First Reading Part 7, read the questions first so you know what to look for, paying attention to the whole idea. If a question asks who found something harder than expected, finding a difficult experience isn’t enough. There must also be a comparison with what the person expected.
Look for the meaning in different words. A question about returning might be answered by someone planning to make another visit or spend another summer there. You won’t always find a neat synonym, either. An expectation might appear in one sentence and the disappointing reality in the next. Once you find a possible match, slow down and read around it.
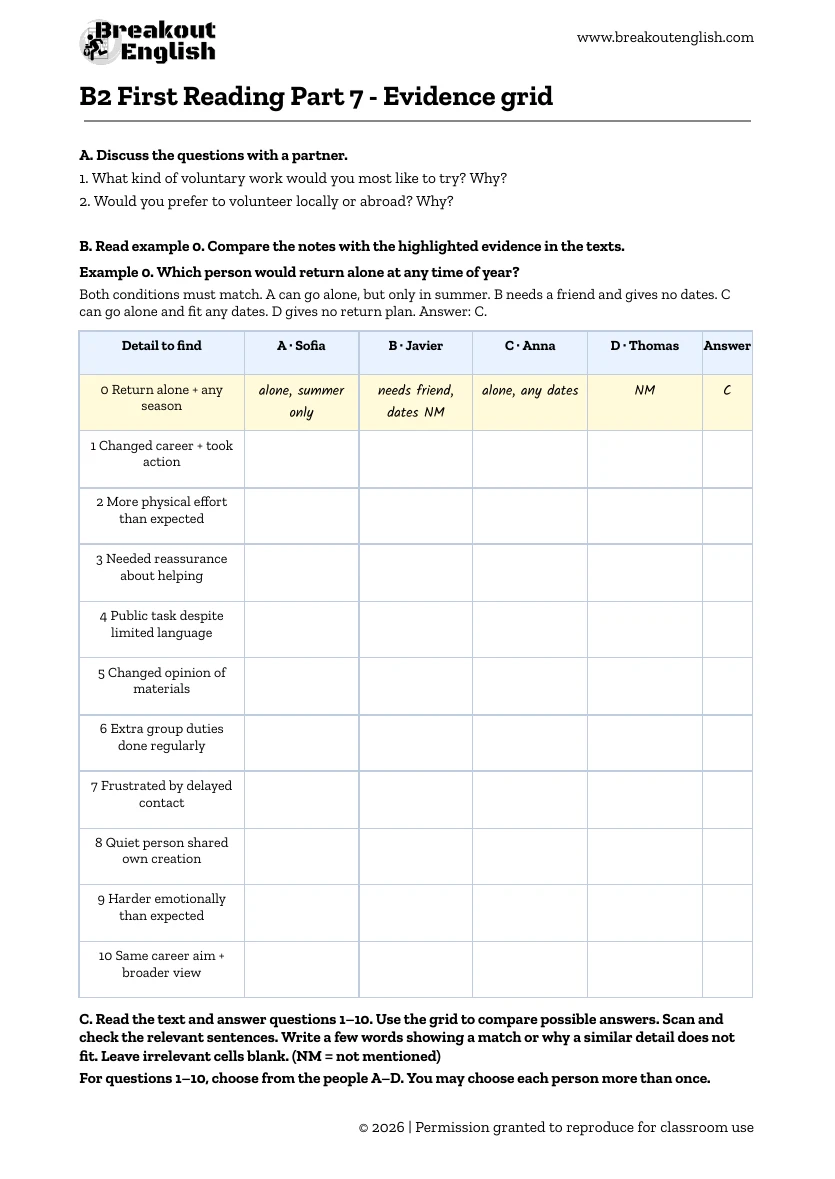
This is where the notes help. Put the questions down the left of a grid and give each person or section a column. As you work through each text, record a few words beside the relevant questions. You can then compare the possibilities without trying to hold everyone’s experiences in your head.

Use the evidence grid as a training technique
At first, taking all these notes may feel time consuming. You’re reading, deciding what matters and putting it into your own words. That effort is the purpose of the activity. It forces you to notice the content of the texts and how the writers build their ideas, rather than choosing a letter because a familiar word has caught your eye.
Pay attention to what happens around a possible answer. A writer might describe an initial opinion and then explain why it changed. A positive statement may be followed by a restriction. Words such as although, provided and until can change whether the detail fits. The useful note captures that relationship: alone for some tasks tells you much more than prefers working alone.
Build up to timed practice
I wouldn’t put students under a strict time limit while they’re learning the technique. Give them time to see how it works first. After a few attempts, the notes should become shorter and the comparisons quicker. Full sentences aren’t necessary, and there’s no benefit in copying half the text into the grid.
Part 7 is the last Reading task on the paper, so candidates working through it in order often reach it with less time than they would like. I try to get students completing it in 10 minutes, with 15 minutes as the maximum. That’s a classroom target, not an official time limit for this part.
The full grid is a way to develop the skill. As you get more comfortable, you may only need a few notes for questions with competing answers.
The materials
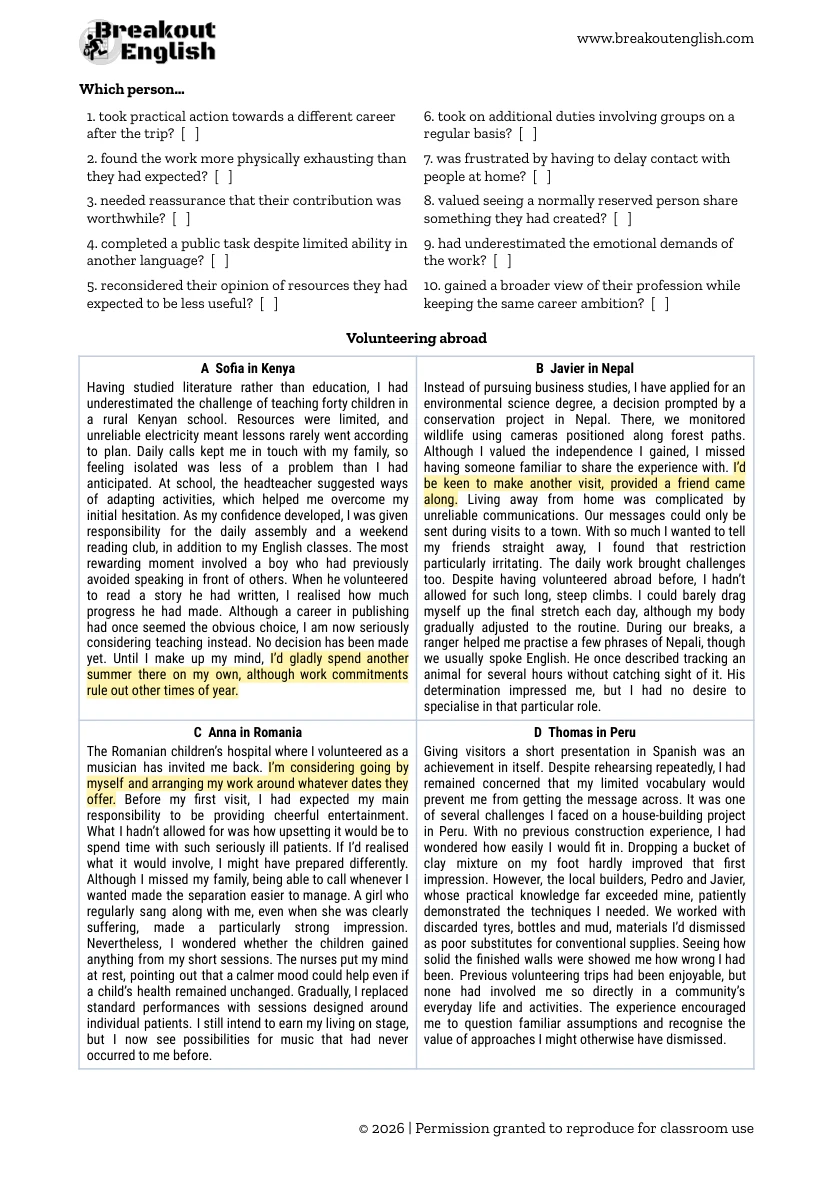
Start with the volunteering worksheet, which includes short discussion questions, a highlighted example and an evidence grid for all ten questions.
For the first attempt, use the highlighted example to show students how a sentence becomes a short note. Then read the ten questions and work through the accounts, adding notes to whichever rows are relevant. The texts won’t all discuss things in the same order, so the grid gives the information a consistent place to go.
After choosing their answers, ask students to compare with a partner before checking. They should explain both why their choice fits and why a tempting alternative doesn’t. If they disagree, send them back to the exact sentences. A useful final question is: Which detail did your notes help you notice? This makes the checking stage part of the reading practice.
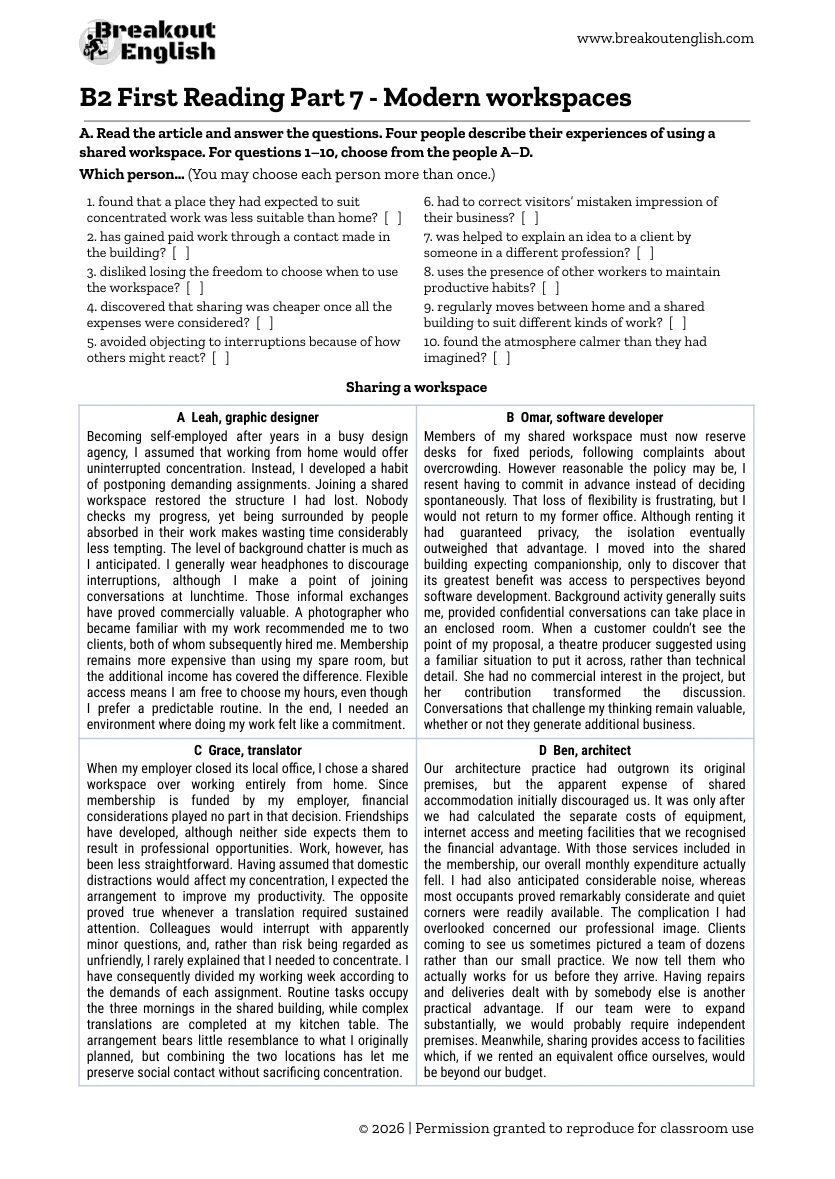
Use the modern workspaces reading afterwards to apply the technique to a fresh exam task with or without the note-taking support.
EXAM PART: B2 First Reading and Use of English Part 7
EXAM SKILLS: Scanning for specific information, recognising paraphrase and comparing details
LEVEL: B2
TOPIC: The world of work
TIME: 45-60 minutes
PREPARATION: One copy of each worksheet per student
Download

Preview